Showing posts with label homemade. Show all posts

Sunday, December 11, 2011

Hamburger Stew for a cold winter's night


I've got a recipe to share today and it's perfect for this time of year. With all the big dinner's going on and family over but you still gotta make your normal every day dinners, this is great to have around in the fridge. It just gets better in the fridge as a matter of fact. It's also one of those recipes that you can add or delete whatever you have on hand. It's filling and warm good comfort food. I hope you enjoy it :)


Hamburger Stew


  • 2 big cans of whole tomatoes
  • potatoes as many as you want
  • carrots about 2 lbs.
  • onion
  • garlic
  • hamburger, about 2 pounds
  • tomato sauces (according to how much you want to make, i.e. how soupy. Sometimes I use a big can of spaghetti sauce)
  • sweet basil
  • oregano
  • salt + pepper


So the first thing I do is get a big pot and get my sauces and tomatoes simmering with the spices in it. This way they get all yummy and flavorful. The longer it simmers the better. 

Side note: This is perfect for my tomatoes that I've frozen from my garden. If you've never done this, it is sooooo much easier than canning. Just toss your washed and cored smaller tomatoes like roma type in freezer bags and freeze those suckers solid. No blanching, no peeling. When you pull them out of the freezer to use, the skins slide right off as they thaw. Great for sauces, soups and chili's.


I then peel my carrots and cut them up in 1" bites and pop them in my micro cooker with a little water to steam them in the microwave. I like my carrots real soft, so I do this instead of just letting them cook in the sauce.


I'm usually in a hurry, so I cut up my potatoes and usually cook them up in my pressure cooker which takes like 3 minutes. I should probably just toss my carrots in there too. You could also just cook them on the stove or microwave.

Then I fry up my burger with the onion and garlic. Drain the grease and add to stew. Let it simmer. You really could serve it up right then, but I like to let all the flavors come together. Serve it up with some butter bread and there you go. Like I said, it is even better the next day.


Let me know if you try it :)


post signature

Thursday, November 10, 2011

Tutorial for Recycled Foam Stamps


I've put together a little tutorial for my homemade stamps at the urging of my friend and Creative Sistah Stephanie of Dragonfly Design Studios.

These "green"and grungy stamps are fun to make and might just fill a little niche that you may need but don't know you need it yet ;)  They are made from the packaging that ground beef, pork or chicken comes in and I've also used a styrofoam box that I brought some left overs home from my favorite Mexican Restaurant.

So here we go...

Here's what you'll need. Sorry, I forgot to add in the ink pad...


Start with your recycled foam. Here I've used the lid from a white styrofoam box.

 
Then cut it up for the usable flat parts

I started with a sketch of a key (in sketchbook) that I thought I might use for something. You don't have to do this, you can just draw straight on your foam and that's what I usually do, but for simplicity's sake, here is a little sketch. Don't forget your drawing will be in reverse.

I put the foam under my sketchbook page and traced over the top of it to dent in the foam, then I traced it with a black marker so you could see it easier.


Then you may want to shade in the parts you want to "carve" out with a sharpened blunt tool like this pencil... it worked great. This kind of stamp looks like a wood carved stamp to me, so make sure you add interesting "cut" marks. I did this by drawing the background with lines going different directions. This will show up on your inked stamp.


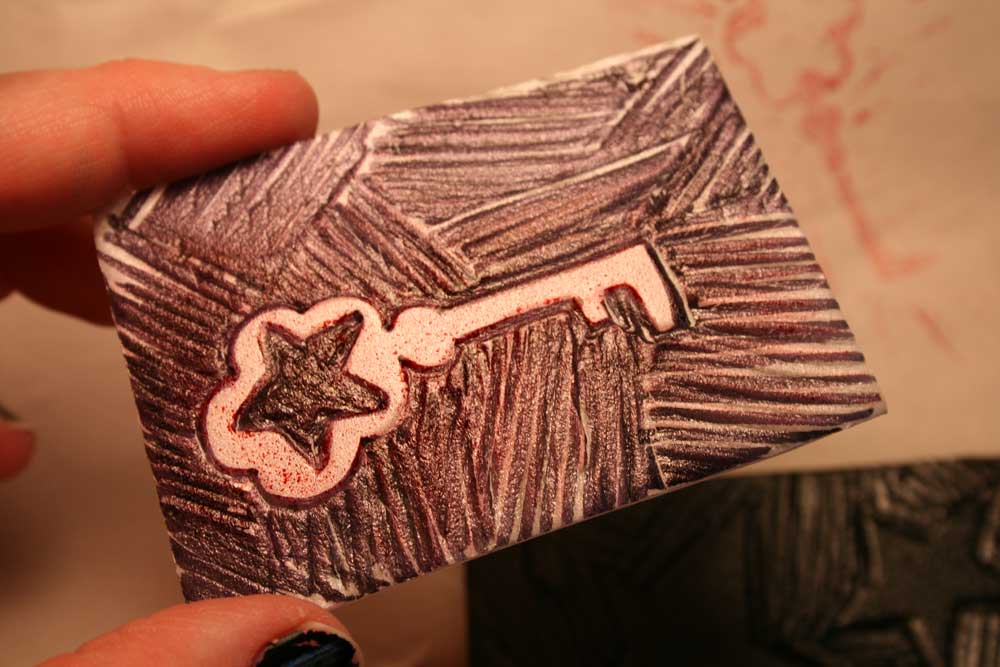
"Carve" out your design by drawing with a little pressure to dent in the foam. The white that is left over will be what the ink adheres to.


Carved ~ See all the dents?
Here's the finished stamp.

stamped on cheap packing paper recycled from a purchase

Stamped in my sketchbook along side of initial sketch
Ok, confession time. As I was thinking about making this tutorial today, I thought I better use white foam instead of the black that I've used up to this point so you all could see it easier. But in all honesty the black really looks better in the end result.
Black meat packaging foam
Here's why, see the thickness difference? You can make a deeper cut (dent) and that produces a better imprint.
white foam on top and black on bottom

Here's the stamp I made from the recycled black meat foam packing after I discovered the white really didn't work out so great. I just free handed the stars on the foam real quick, which I usually do anyway and they generally turn out better! haha


Not sure if you can see how much deeper the cuts are (above), but it is fairly significant. So if you plan to do this, do your own experiment or just learn from me here and use the black.

Here's the imprint it made... yee haw!


The foam makes the stamp look mottled and grungy and the cut marks just add to the charm. I love it. This is not for intricate designs, for that get some Speedball Speedy Carve foam and a Speedball Linoleum cutter from the craft or art store, I like Blick Art Materials myself unless you've got yourself a 40% off coupon from Michaels, then get it there!

I hope you've enjoyed my first tutorial!  :)  Feel free to email me with any questions.

Happy stamp creating!

post signature

Friday, November 4, 2011

Homemade Stamps!


Today I made my own stamps. I've wanted to do this for a while now and I have a new project in mind. But it would cost a small fortune to purchase so many plus I might not be able to find exactly what I needed. So what's a creative but not so rich artist to do? Why... make their own of course!  I was so pleased with the way they look. Totally grungy like I wanted.

Right now, I'm just using foam and a pencil and a plastic tool that is a flower pick. Check out what I've got so far. These are fun to make! You should try some of your own :)


I'm linking up with Paint Party Friday, although technically I'm not painting... but I've missed it so hey... sue me. Go check out the other players, ok?

Have a great Friday night!


post signature

LinkWithin

Related Posts with Thumbnails

Join the Spooky Fun!